Weekender Bag Chat: Part One
This week on instagram folks have been asking questions about my weekender bag, I thought it might be a fun blog post to share my thoughts and experiences. So far I've made two and I'm currently working on a third patchwork version. As soon as I publish this post, I'll post a Part Two which will be about my current WIP, the patchwork version. Sound good??!
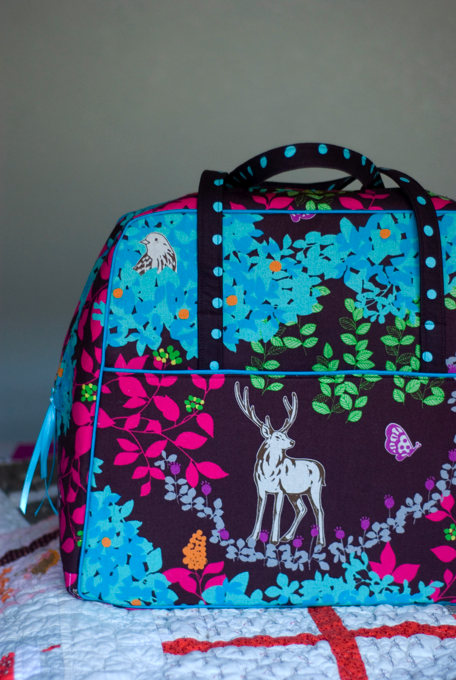
This is the second Weekender Bag I've made, if you aren't familiar with the pattern, it's by Amy Butler and a pretty neat bag! It's sort of a crowning achievement bag, it says HEY I MADE THIS PROFESSIONAL LOOKING BAG. And it is rumored to be one of the hardest bags to make (it's not. I pinkie swear!)
I wanted to make a second one because I didn't really *love love* my first one, I made lots of mistakes, I substituted a fusible batting for the pellon, inserted the lining by machine, etc. I guess I shouldn't say mistakes, I should say, tried something new that didn't work. ;) So this time I was determined to follow the pattern properly from start to finish. I don't know about you but that is HARD. Sometimes I want to read ahead and ignore things.
But this time I didn't. I used the suggested interfacings. I used the correct zipper. I slip stitched the lining in. And I have a bag I crazy love. Like, love love love!!!
Here are my changes to the pattern:
- I didn't use the end pockets. I felt like they made an already busy bag way busier looking. This fabric is LOUD and it was super noticeable where I wasn't able to line up the pattern correctly. I added the pockets and felt like the bag looked sloppy, I kind of wanted to cry. I let it marinate overnight and looked again in the morning with fresh eyes. I took them off (I hated doing that!) and voila! Much better. Sometimes less is more.
- I bought piping! Yup! Two packages at JoAnns. I couldn't find a size cording that I liked, the piping foot for the Bernina I have is $70 (omg! >:() and this way if I didn't like the piping, I wasn't out a ton of time. Sometimes you can luck out and find a perfect match!
- I was creative with my fabric cutting. Sometimes I think Amy Butler's Bag patterns have a lot of waste, like fabric can be laid differently to save fabric. I can't remember exactly what I had but I know my lining/handles are two 1/2 yard cuts. I had one blue and brown dots and then one the reversal. I shopped in my stash and used what I had. No one would know and I love how it looks.
- I suggest cutting out the pattern pieces and play around with your fabric, do you have a bit that you want to display? In my case I knew I had to have that deer on the front, so I unfolded, refolded, pinned, unpinned my pattern pieces around until I could cut the required amounts from the fabric I had. I don't have a giant fabric budget so I truly believe in shopping your stash, making do with what you have and triple checking before you cut! You might find you need a lot less fabric. I didn't follow the lay out guide and I'm ok with that. Try other options before cutting.
- Make friends with your walking foot. Truly. This bag is not HARD but there are layers of fabric and interfacing that make it stiff which creates an AMAZING finished bag but can be tricky to sew. I used a combination of Clover Wonder Clips and binder clips. Don't bother with pins. Seriously. You'll bend them and feel frustrated, especially if you are using the yellow & blue Clover Glass Head pins.
- Mark on your sewing machine with washi tape (for cuteness!) or regular tape your 1/2 inch mark. My mind is constantly stuck in 1/4 inch zone and I struggle using any other seam. I need the visual reminder and the tape to butt my fabric up against when I sew.
- Use a heavy duty needle, I used leather because I didn't have any denim. The needle will go through the fabric much smoother.
- Don't try to do this bag in one day. No seriously. My biggest tip is to break it up into parts. I spent one evening cutting, another evening cutting interfacing, one afternoon making the pieces, an afternoon assembling it and an hour hand stitching the lining on. I know, it seems intimidating and you are thinking "BUT I DON'T HAVE TIME", trust me on this, set your phones alarm for ONE HOUR and just sit down and break it up into chunks. There are a lot of small details in the pattern that deserve your uninterrupted attention. For example one mistake I made was sewing all four sides of the bottom, you only sew 3 in order to place in the Peltex. Dumb move. Why did I do it? Because I was trying to rush before Chop got home. It's so worth it to read the instructions multiple times and just sit and FOCUS.
- I think some people call this bag HARD because of the steps required and the amount of cutting/time. It's true, some parts are tedious (3 layers of interfacing on the zipper area about did me in. snooze fest 2012!!) BUT it's worth it for the end result. I'd say an intermediate beginner could make this bag, no problem, as long as they broke it up into chunks and took their time!
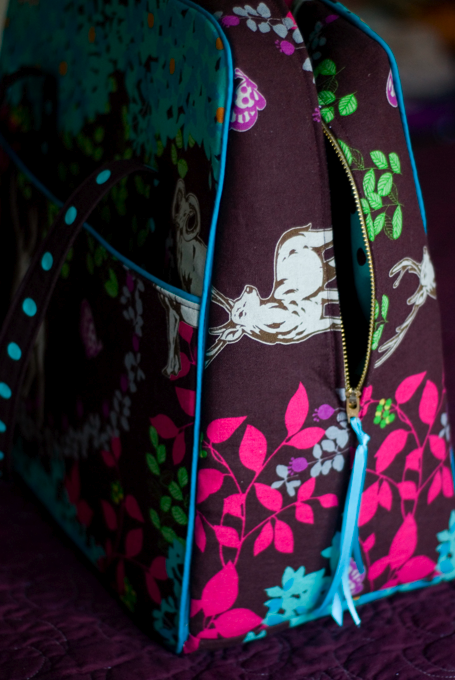
- Do you have a 1/4 inch foot with a guide? If so, I suggest using it for the zipper installation. I basted the zipper into place, then put the guide of my foot in the zipper slit, this made my top stitching nice and neat!
- Shop for interfacing with the JoAnn's app! Use coupons! The cost of interfacing, zipper and piping can add up fast!
- This is a deluxe bag. In all my photos you can see, it is FIRM. It stands up on it's own. When I brought it to my knitting class & Starbucks, no one could believe it was handmade. I believe 100% that this is because how it's interfaced. I did use Echino fabric for both the outer and lining which is a home decor linen. I do believe it's worth using the suggested Peltex #70.
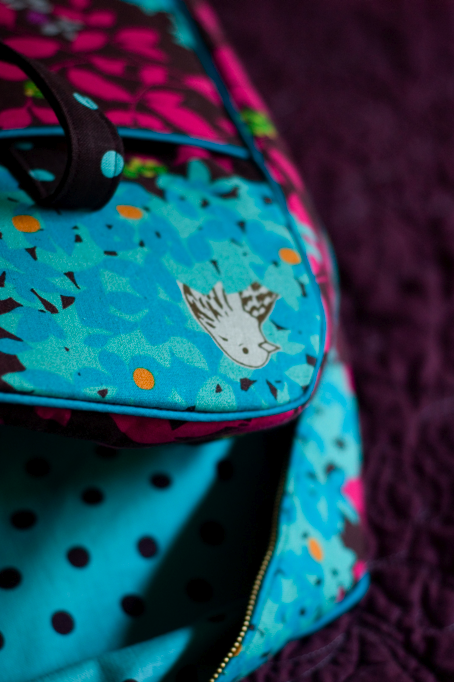
(contrasting lining! normally the handle fabric is the lining...not here, being thrifty with what I had in the ol' stash!)
Things I found challenging:
- The number one thing I found challenging was slip stitching the lining in. Not because it's hard but because I had a hard time pushing my needle through the fabric and the zipper. I ended up stitching my lining in right next to the zipper. It's not super glamourous but it's ok!
- I struggled with one corner when I assembled the bag, I kept being too far away from the piping. In the end I hand sewed that 2 inch spot. You can't tell the difference!
- Getting the pattern on the fabric to line up perfectly with the pockets. It's not amazing, but I got it to work!
Things I'd do differently:
- My next bag is going to have feet!
- No outer pockets again!
- But lots of inner pockets!
- Adding magnetic snaps to the outer pockets!
I hope this helps! It's seriously not a hard bag & I totally believe you can do it. It's well worth the end result, I've found it's the perfect knitting bag!